简介
SpringMVC是Spring下的一个用于Web表现层开发的技术。相比Servlet,SpringMVC更加高效快捷。
SpringMVC流程如下:
- 浏览器发送请求到Tomcat服务器;
- Tomcat接收请求后,将请求交给SpringMVC中的
DispatcherServlet(前端控制器)来处理。 DispatcherServlet按照对应规则将请求分发到对应的Bean。Bean由我们自己编写来处理不同的请求。 每个Bean中可以处理一个或多个不同的请求 URL。
DispatcherServlet和Bean对象都需要交给Spring容器来进行管理。
综上,我们需要编写的内容为:
Bean对象;请求URL和
Bean对象对应关系的配置;构建Spring容器。
将
DispatcherServlet和Bean对象交给容器管理。配置Tomcat服务器。
使Tomcat能够识别Spring容器,并将请求交给容器中的
DispatcherServlet来分发请求。
项目的基本实现步骤如下:
- 创建Web工程(Maven结构),并在工程的
pom.xml中添加SpringMVC和Servlet坐标。 - 创建SpringMVC控制器类(等同于Servlet功能)。
- 初始化SpringMVC环境(同Spring环境),设定SpringMVC加载对应的
Bean。 - 初始化Servlet容器,加载SpringMVC环境,并设置SpringMVC技术处理的请求。
Spring MVC 工作流程
SpringMVC的使用过程共分两个阶段:
启动服务器初始化过程;
服务器启动,执行
ServletConfig类,初始化Web容器。根据
getServletConfigClasses获取所需的SpringMVC配置类(这里是SpringMvcConfig)来初始化SpringMVC的容器。加载
SpringMvcConfig配置类。执行
@ComponentScan加载对应的Bean。扫描指定包下所有类上的注解,将所有的Controller类(如有
@Controller、@RestController等注解的类)加载到容器中。加载每一个
Controler。使用
@RequestMapping建立请求路径与Controler中的方法的对应关系。执行
getServletMappings方法,定义所有的请求都通过SpringMVC。如:1protected Spring[] getServletMappings() { 2 return new Spring[]{"/"}; 3}/代表所拦截请求的路径规则,只有被拦截后才能交给SpringMVC来处理请求。
单次请求过程。
- 根据请求路径发送请求。
- Web容器将符合设置的请求路径的请求交给SpringMVC处理。
- 解析请求路径。
- 执行匹配对应请求路径的方法。
- 将有
@ResponseBody方法的返回值作为响应体返回给请求方。
项目环境及结构
项目结构
使用SpringMVC开发的项目结构如下:
- 📁
project-file-name- 📁
src- 📁
main- 📁
java- 📁
com.linner- 📁
config—— 配置类 - 📁
controller—— 表现层 - 📁
dao—— 持久层 - 📁
domain—— 实体类 - 📁
service—— 业务层
- 📁
- 📁
- 📁
resourcs - 📁
webapp
- 📁
- 📁
- 📁
这种项目结构采用了SSM架构,即:
- 表现层;
- 持久层;
- 业务层。
通过IDEA创建SpringMVC项目步骤如下:
创建基础的Maven-Archetype-Webapp项目。
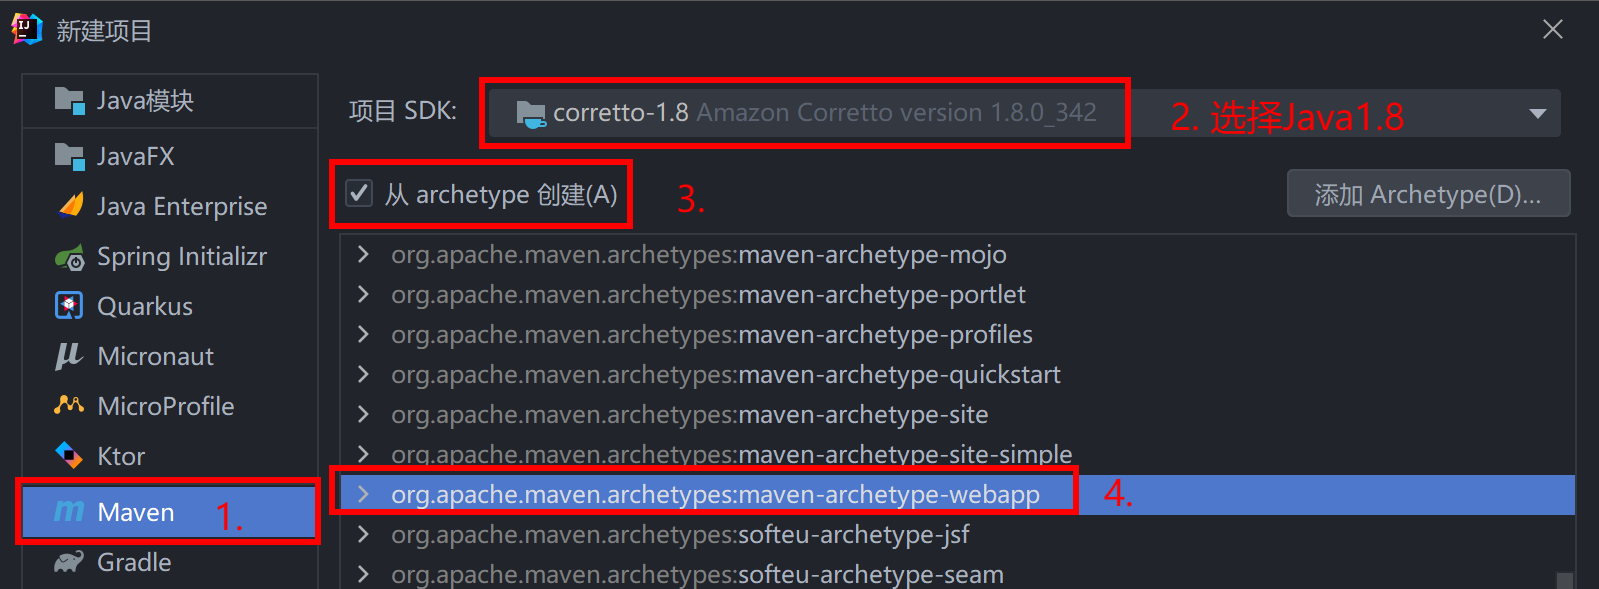
补全项目结构:
- 📁
src- 📁
main- 📁
java - 📁
resourcs - 📁
webapp
- 📁
- 📁
- 📁
修改
pom.xml文件:将多余的内容删除,然后添加SpringMVC所需的依赖。如:
 1<?xml version="1.0" encoding="UTF-8"?>
 2
 3<project xmlns="http://maven.apache.org/POM/4.0.0" xmlns:xsi="http://www.w3.org/2001/XMLSchema-instance"
 4xsi:schemaLocation="http://maven.apache.org/POM/4.0.0 http://maven.apache.org/xsd/maven-4.0.0.xsd">
 5  <modelVersion>4.0.0</modelVersion>
 6
 7  <groupId>com.linner</groupId>
 8  <artifactId>springmvc-demo</artifactId>
 9  <version>1.0-SNAPSHOT</version>
10  <packaging>war</packaging>
11
12  <properties>
13    <project.build.sourceEncoding>UTF-8</project.build.sourceEncoding>
14    <maven.compiler.source>1.8</maven.compiler.source>
15    <maven.compiler.target>1.8</maven.compiler.target>
16  </properties>
17
18  <dependencies>
19
20    <!-- ... -->
21
22  </dependencies>
23
24  <build>
25    <plugins>
26
27      <!-- ... -->
28
29    </plugins>
30  </build>
31</project>
基础环境
Tomcat7 Maven插件:
 1<plugin>
 2  <groupId>org.apache.tomcat.maven</groupId>
 3  <artifactId>tomcat7-maven-plugin</artifactId>
 4  <version>2.1</version>
 5  <configuration>
 6    <port>80</port>
 7    <path>/</path>
 8    <uriEncoding>UTF-8</uriEncoding>
 9  </configuration>
10</plugin>
基础依赖:
 1<!-- Servlet -->
 2<dependency>
 3    <groupId>javax.servlet</groupId>
 4    <artifactId>javax.servlet-api</artifactId>
 5    <version>3.1.0</version>
 6    <!-- Servlet需要修改作用范围,否则会与Tomcat中的servlet-api包发生冲突 -->
 7    <!-- provided代表的是该包只在编译和测试的时候用 -->
 8    <scope>provided</scope>
 9</dependency>
10<!-- SpringMVC -->
11<dependency>
12    <groupId>org.springframework</groupId>
13    <artifactId>spring-webmvc</artifactId>
14    <version>5.2.10.RELEASE</version>
15</dependency>
DAO 相关依赖环境
使用SpringMVC构建Web项目,除了以上基础配置外,还需要导入其他配置。
DAO相关的坐标:
 1<!-- Spring JDBC -->
 2<dependency>
 3  <groupId>org.springframework</groupId>
 4  <artifactId>spring-jdbc</artifactId>
 5  <version>5.2.10.RELEASE</version>
 6</dependency>
 7<!-- MySQL -->
 8<dependency>
 9  <groupId>mysql</groupId>
10  <artifactId>mysql-connector-java</artifactId>
11  <version>5.1.47</version>
12</dependency>
13<!-- MyBatis -->
14<dependency>
15  <groupId>org.mybatis</groupId>
16  <artifactId>mybatis</artifactId>
17  <version>3.5.6</version>
18</dependency>
19<!-- MyBatis Spring依赖 -->
20<dependency>
21  <groupId>org.mybatis</groupId>
22  <artifactId>mybatis-spring</artifactId>
23  <version>1.3.0</version>
24</dependency>
25<!-- Druid 数据库连接池 -->
26<dependency>
27  <groupId>com.alibaba</groupId>
28  <artifactId>druid</artifactId>
29  <version>1.1.16</version>
30</dependency>
其它依赖环境
 1<!-- Jackson -->
 2<dependency>
 3  <groupId>com.fasterxml.jackson.core</groupId>
 4  <artifactId>jackson-databind</artifactId>
 5  <version>2.9.0</version>
 6</dependency>
 7
 8<!-- 日志 -->
 9<dependency>
10  <groupId>ch.qos.logback</groupId>
11  <artifactId>logback-classic</artifactId>
12  <version>1.2.3</version>
13</dependency>
14
15<!-- Thymeleaf(不常用) -->
16<dependency>
17  <groupId>org.thymeleaf</groupId>
18  <artifactId>thymeleaf-spring5</artifactId>
19  <version>3.0.12.RELEASE</version>
20</dependency>
21
22<!-- 文件上传依赖 -->
23<dependency>
24  <groupId>commons-fileupload</groupId>
25  <artifactId>commons-fileupload</artifactId>
26  <version>1.3.1</version>
27</dependency>
28
29<!-- Test -->
30<!-- Junit 单元测试 -->
31<dependency>
32  <groupId>junit</groupId>
33  <artifactId>junit</artifactId>
34  <version>3.8.1</version>
35  <scope>test</scope>
36</dependency>
配置
配置SpringMVC有两种方式:
web.xml配置文件- 配置类
配置文件方式
在web.xml中注册SpringMVC的前端控制器DispatcherServlet:
 1<!DOCTYPE web-app PUBLIC
 2 "-//Sun Microsystems, Inc.//DTD Web Application 2.3//EN"
 3 "http://java.sun.com/dtd/web-app_2_3.dtd" >
 4
 5<web-app>
 6    <servlet>
 7        <servlet-name>springMVC</servlet-name>
 8        <!-- 指定SpringMVC前端控制器: -->
 9        <servlet-class>org.springframework.web.servlet.DispatcherServlet</servlet-class>
10    </servlet>
11    <servlet-mapping>
12        <servlet-name>springMVC</servlet-name>
13        <!--
14            配对路径
15            / 表示处理所有不包括.jsp的请求
16            因为.jsp有自己的servlet,如果在DispatcherServlet中处理.jsp,会导致找不到相应页面,从而导致渲染失败
17        -->
18        <url-pattern>/</url-pattern>
19    </servlet-mapping>
20</webapp>
<url-pattern>:
/:表示匹配所有不包括.jsp的请求;/*:能够匹配所有请求,包括.jsp。
扩展配置:
web.xml中的配置还可以定义在其它文件中,例如在resourece下创建新的配置文件springMVC.xml。然后在web.xml添加新配置:
 1<!--
 2    配置SpringMVC的前端控制器
 3    对浏览器发送的请求统一进行处理
 4 -->
 5<webapp>
 6    <servlet>
 7        <servlet-name>springMVC</servlet-name>
 8        <servlet-class>org.springframework.web.servlet.DispatcherServlet</servlet-class>
 9        <!--
10            通过初始化参数指定SpringMVC配置文件的位置和名称
11         -->
12        <init-param>
13            <!-- contextConfigLocation为固定值 -->
14            <param-name>contextConfigLocation</param-name>
15            <!--
16                使用 classpath: 表示从类路径查找配置文件,例如maven工程中的src/main/resources
17             -->
18            <param-value>classpath:springMVC.xml</param-value>
19        </init-param>
20        <!--
21            将启动控制DispatcherServlet的初始化时间提前到服务器启动时:
22        -->
23        <load-on-startup>1</load-on-startup>
24    </servlet>
25
26    <!-- ... -->
27
28</webapp>
在springMVC.xml中配置:
 1<?xml version="1.0" encoding="UTF-8"?>
 2<beans xmlns="http://www.springframework.org/schema/beans"
 3       xmlns:xsi="http://www.w3.org/2001/XMLSchema-instance"
 4       xmlns:context="http://www.springframework.org/schema/context" xmlns:mvc="http://www.springframework.org/schema/mvc"
 5       xsi:schemaLocation="http://www.springframework.org/schema/beans http://www.springframework.org/schema/beans/spring-beans.xsd http://www.springframework.org/schema/context https://www.springframework.org/schema/context/spring-context.xsd http://www.springframework.org/schema/mvc http://www.springframework.org/schema/mvc/spring-mvc.xsd">
 6
 7    <!-- 自动扫描包 -->
 8    <context:component-scan base-package="com.linner.controller"/>
 9
10    <!-- 配置Thymeleaf视图解析器(不常用) -->
11    <bean id="viewResolver" class="org.thymeleaf.spring5.view.ThymeleafViewResolver">
12        <property name="order" value="1"/>
13        <!-- 设置编码,将编码都转为 UTF-8 -->
14        <property name="characterEncoding" value="UTF-8"/>
15        <property name="templateEngine">
16            <bean class="org.thymeleaf.spring5.SpringTemplateEngine">
17                <property name="templateResolver">
18                    <bean class="org.thymeleaf.spring5.templateresolver.SpringResourceTemplateResolver">
19
20                        <!-- 视图前缀 -->
21                        <property name="prefix" value="/WEB-INF/templates/"/>
22
23                        <!-- 视图后缀 -->
24                        <property name="suffix" value=".html"/>
25                        <property name="templateMode" value="HTML5"/>
26                        <property name="characterEncoding" value="UTF-8" />
27                    </bean>
28                </property>
29            </bean>
30        </property>
31    </bean>
32
33    <!-- 静态资源访问 -->
34    <mvc:view-controller path="/" view-name="index" />
35
36    <!--
37        处理静态资源,例如html、js、css、jpg
38        若只设置该标签,则只能访问静态资源,其他请求则无法访问
39        此时必须设置<mvc:annotation-driven/>解决问题
40    -->
41    <mvc:default-servlet-handler/>
42
43    <!-- 开启mvc注解驱动 -->
44    <mvc:annotation-driven>
45        <mvc:message-converters>
46            <!-- 处理响应中文内容乱码 -->
47            <bean class="org.springframework.http.converter.StringHttpMessageConverter">
48                <property name="defaultCharset" value="UTF-8" />
49                <property name="supportedMediaTypes">
50                    <list>
51                        <value>text/html</value>
52                        <value>application/json</value>
53                    </list>
54                </property>
55            </bean>
56        </mvc:message-converters>
57    </mvc:annotation-driven>
58</beans>
在视图解析器中设置了视图前缀
<property name="prefix" ...>和视图后缀<property name="suffix" ...>,那么在Controller的方法中,想要跳转到视图时,只需返回对应的视图文件名称,并去掉其后缀。例如访问hello.html只需返回"hello",但hello.html必须要在对应的前缀路径中。
SpringMVC编码过滤器(必须在web.xml中进行注册):
 1<webapp>
 2    <!-- 配置 SpringMVC 的编码过滤器 -->
 3    <filter>
 4        <filter-name>CharacterEncodingFilter</filter-name>
 5        <filter-class>org.springframework.web.filter.CharacterEncodingFilter</filter-class>
 6        <init-param>
 7            <param-name>encoding</param-name>
 8            <param-value>UTF-8</param-value>
 9        </init-param>
10        <init-param>
11            <param-name>forceResponseEncoding</param-name>
12            <param-value>true</param-value>
13        </init-param>
14    </filter>
15    <filter-mapping>
16        <filter-name>CharacterEncodingFilter</filter-name>
17        <url-pattern>/*</url-pattern>
18    </filter-mapping>
19
20    <servlet>
21        <!-- ... -->
22    </servlet>
23
24    <!-- ... -->
25
26</webapp>
SpringMVC中处理编码的过滤器一定要配置到其他过滤器之前,否则无效。
配置类方式
使用配置类则无需在webapp/WEB-INF中添加web.xml文件(当然也可以选择添加)。
SpringMVC项目至少需要ServletConfig、SpringConfig和SpringMvcConfig这三个配置类。
- ServletConfig:Spring MVC项目初始化类,也是项目的入口,作用与
web.xml类似。 - SpringConfig:控制业务(Service)和功能(如DataSource、SqlSessionFactoryBean、 MapperScannerConfigurer等)相关的Bean。
- SpringMvcConfig(WebConfig):加载表现层Bean(Controller)。
ServletConfig(Web项目入口配置类):
 1public class ServletConfig extends AbstractAnnotationConfigDispatcherServletInitializer {
 2
 3    /**
 4     * 指定Spring的配置类
 5     */
 6    @Override
 7    protected Class<?>[] getRootConfigClasses() {
 8        return new Class[]{SpringConfig.class};
 9    }
10
11    /**
12     * 指定Spring MVC的配置类
13     */
14    @Override
15    protected Class<?>[] getServletConfigClasses() {
16        return new Class[]{SpringMvcConfig.class};
17    }
18
19    /**
20     * 指定DispatcherServlet的映射路径,即url-pattern
21     */
22    @Override
23    protected String[] getServletMappings() {
24        return new String[]{"/"};
25    }
26}
ServletConfig最重要的是继承AbstractAnnotationConfigDispatcherServletInitializer这个类,并反别重写它的三个方法。在Servlet3.0环境中,容器会在类路径中查找实现
javax.servlet.ServletContainerlnitializer接口的类,如果找到的话就用它来配置Servlet容器。Spring提供了这个接口的实现,名为
SpringServletContainerlnitializer,这个类反过来又会查找实现WebApplicationInitializer的类并将配置的任务交给它们来完成。Spring3.2引l入了一个便利的
WebApplicationInitializer基础实现,名为AbstractAnnotationConfigDispatcherServletlnitializer,当我们的类扩展了AbstractAnnotationConfigDispatcherServletInitializer,并将其部署到Servlet3.O容器的时候,容器会自动发现它,并用它来配置Servlet上下文。
SpringConfig(启动Tomcat服务器时加载Spring配置类):
1@Configuration
2@ComponentScan({"com.linner.service"})
3@PropertySource("classpath:jdbc.properties")
4@Import({JdbcConfig.class, MyBatisConfig.class}) // 引入其它配置
5@EnableTransactionManagement    // 开启事务管理
6public class SpringConfig {
7}
Spring需要管理的是
service包和dao包。但dao包最终是交给MapperScannerConfigurer对象来进行扫描处理的。所以SpringConfig只需要扫描到service包即可。演示
@ComponentScan的另一种用法(排除controller包中的Bean):1@ComponentScan(value="com.linner", 2 excludeFilters=@ComponentScan.Filter( 3 type = FilterType.ANNOTATION, 4 classes = Controller.class // 排除@Controller定义的Bean 5 ) 6)上面方法本质是使用
@ComponentScan的excludeFilters属性设置过滤规则。
type:设置排除规则。
ANNOTATION:按照注解排除。ASSIGNABLE_TYPE:按照指定的类型过滤。ASPECTJ:按照Aspectj表达式排除(基本上不会用)。REGEX:按照正则表达式排除。CUSTOM:按照自定义规则排除。
classes:设置排除的具体注解类。
SpringMvcConfig
 1@Configuration
 2@ComponentScan({"com.linner.controller"})
 3@EnableWebMvc   // MVC注解驱动
 4public class WebConfig implements WebMvcConfigurer {
 5
 6    /**
 7     * 相当于 default-servlet-handler
 8     */
 9    @Override
10    public void configureDefaultServletHandling(DefaultServletHandlerConfigurer configurer) {
11        configurer.enable();
12    }
13
14    /**
15     * 视图控制器 view-controller
16     */
17    @Override
18    public void addViewControllers(ViewControllerRegistry registry) {
19        registry.addViewController("/hello").setViewName("hello");
20    }
21
22    /**
23     * 文件上传解析器
24     */
25    @Bean
26    public MultipartResolver getMultipartResolver() {
27        CommonsMultipartResolver commonsMultipartResolver = new CommonsMultipartResolver();
28        return commonsMultipartResolver;
29    }
30
31    /**
32     * 异常处理解析器
33     */
34    @Override
35    public void configureHandlerExceptionResolvers(List<HandlerExceptionResolver> exceptionResolvers) {
36        SimpleMappingExceptionResolver exceptionResolver = new SimpleMappingExceptionResolver();
37        Properties prop = new Properties();
38        prop.setProperty("java.lang.ArithmeticException", "error");
39        exceptionResolver.setExceptionMappings(prop);
40        // 可以不设置,默认键即为 exception
41        exceptionResolver.setExceptionAttribute("exception");
42        exceptionResolvers.add(exceptionResolver);
43    }
44
45    /**
46     * 模板解析器
47     */
48    @Bean
49    public ITemplateResolver getTemplateResolver() {
50
51        // 获取当前的 WebApplicationContext
52        WebApplicationContext webApplicationContext = ContextLoader.getCurrentWebApplicationContext();
53        // 使用WebApplicationContext获取ServletContext,并构造ServletContextTemplateResolver
54        ServletContextTemplateResolver templateResolver = new ServletContextTemplateResolver(
55                webApplicationContext.getServletContext());
56
57        // 设置视图前缀
58        templateResolver.setPrefix("/WEB-INF/templates/");
59        // 设置视图后缀
60        templateResolver.setSuffix(".html");
61
62        templateResolver.setCharacterEncoding("UTF-8");
63        templateResolver.setTemplateMode(TemplateMode.HTML);
64
65        return templateResolver;
66    }
67
68    /**
69     * 模板引擎
70     * @param templateResolver 模板解析器(自动装配,@Autowired可忽略不写)
71     */
72    @Bean
73    public SpringTemplateEngine getTemplateEngine(ITemplateResolver templateResolver) {
74
75        SpringTemplateEngine templateEngine = new SpringTemplateEngine();
76        templateEngine.setTemplateResolver(templateResolver);
77
78        return templateEngine;
79    }
80
81    /**
82     * 设置视图解析器
83     * @param templateEngine 模板引擎(自动装配)
84     */
85    @Bean
86    public ViewResolver getViewResolver(SpringTemplateEngine templateEngine) {
87
88        ThymeleafViewResolver viewResolver = new ThymeleafViewResolver();
89        viewResolver.setCharacterEncoding("UTF-8");
90        viewResolver.setTemplateEngine(templateEngine);
91
92        return viewResolver;
93    }
94}
关于Spring MVC的配置类,除了扫描组件和配置模板解析器外,Spring提供了两种方式来配置,一种是实现
WebMvcConfigurer接口,另一种是继承WebMvcConfigurationSupport。由于Java 8的接口中提供了default关键字来修饰接口方法,使得接口可以存在默认的实现,所以使用WebMvcConfigurer接口也不必实现所有接口。而在SpringBoot 2中使用WebMvcConfigurationSupport有可能会导致SpringBoot的自动配置不生效,并且在Spring MVC中使用WebMvcConfigurationSupport也可能导致配置类不生效,所以我个人推荐使用WebMvcConfigurer。如果你使用
WebMvcConfigurationSupport后发现拦截器等配置不生效,那么可以尝试实现WebMvcConfigurer接口来解决问题。
DAO相关配置类:
jdbc.properties(数据库配置,放在项目中resources目录下):
1jdbc.driver=com.mysql.jdbc.Driver
2jdbc.url=jdbc:mysql:///spring_db?useSSL=false&characterEncoding=utf-8
3jdbc.username=root
4jdbc.password=123456
JdbcConfig:
 1public class JdbcConfig {
 2
 3    @Value("${jdbc.driver}")
 4    private String driver;
 5    @Value("${jdbc.url}")
 6    private String url;
 7    @Value("${jdbc.username}")
 8    private String username;
 9    @Value("${jdbc.password}")
10    private String password;
11
12    @Bean
13    public DataSource dataSource(){
14        DruidDataSource dataSource = new DruidDataSource();
15        dataSource.setDriverClassName(driver);
16        dataSource.setUrl(url);
17        dataSource.setUsername(username);
18        dataSource.setPassword(password);
19        return dataSource;
20    }
21
22    @Bean
23    public PlatformTransactionManager transactionManager(DataSource dataSource){
24        DataSourceTransactionManager ds = new DataSourceTransactionManager();
25        ds.setDataSource(dataSource);
26        return ds;
27    }
28}
MyBatisConfig:
 1public class MyBatisConfig {
 2    @Bean
 3    public SqlSessionFactoryBean sqlSessionFactory(DataSource dataSource){
 4        SqlSessionFactoryBean factoryBean = new SqlSessionFactoryBean();
 5        factoryBean.setDataSource(dataSource);
 6        factoryBean.setTypeAliasesPackage("com.linner.domain");
 7        return factoryBean;
 8    }
 9
10    @Bean
11    public MapperScannerConfigurer mapperScannerConfigurer(){
12        MapperScannerConfigurer msc = new MapperScannerConfigurer();
13        msc.setBasePackage("com.linner.dao");
14        return msc;
15    }
16}
使用过滤器转换编码
在ServletConfig中重写AbstractAnnotationConfigDispatcherServletInitializer的getServletFilters()来注册过滤器:
 1/**
 2 * 注册过滤器
 3 */
 4@Override
 5protected Filter[] getServletFilters() {
 6
 7    // 设置编码,将编码都转为 UTF-8
 8    CharacterEncodingFilter characterEncodingFilter = new CharacterEncodingFilter();
 9    characterEncodingFilter.setEncoding("UTF-8");
10    characterEncodingFilter.setForceEncoding(true);
11
12    HiddenHttpMethodFilter hiddenHttpMethodFilter = new HiddenHttpMethodFilter();
13
14    return new Filter[]{characterEncodingFilter, hiddenHttpMethodFilter};
15}
请求与响应
SpringMVC是Web层的框架,主要作用是接收请求、接收数据、响应结果。
编写Controller只需要在Controller类上使用@Controller注解即可。
请求映射 RequestMapping
映射请求路径使用@RequestMapping注解。注解中的使用value属性指定映射的请求路径(由于是value属性,所以当注解中无需指定其它参数时,可以省略)。
@RequestMapping可以分别作用在类和方法上:
 1@Controller
 2@RequestMapping("/user")
 3public class UserController {
 4    @RequestMapping(value = "/helloSpring")
 5    @ResponseBody
 6    public String helloSpring() {
 7        return "Hello Spring!";
 8    }
 9
10    @RequestMapping("/helloWorld")
11    @ResponseBody
12    public String helloWorld() {
13        return "Hello World!";
14    }
15}
方法上定义的
@RequestMapping是具体的请求方式,包括请求路径和请求方式。即,如果在方法上使用了
@RequestMapping并且没有在类上使用@RequestMapping,那么该方法的请求路径即为方法上@RequestMapping中的值。类上定义的
@RequestMapping是请求目录。即,如果在方法和类上均使用了
@RequestMapping,那么该方法的请求路径需要加上类@RequestMapping注解中定义的目录。例如上方代码中的请求路径为/user/helloSpring和/user/helloWorld。
value属性是一个字符串数组,可以通过以下方式来指定多个请求路径:
1@RequestMapping({"hello", "helloWorld"})
@RequestMapping除了value属性外,还有method属性。method属性是用来指定请求方式的,如:@RequestMapping(method = RequestMethod.POST)(匹配POST请求方式)。
在客户端向服务器发送请求时,
DispatcherServlet会首先根据@RequestMapping获取对应的控制器方法。
接收 Query 参数
Query参数,也就是拼接在请求路径后面,以?开始,使用&分隔每个参数项的参数传递方式。例如:
1http://localhost/user/hello?name=张三
接收Query参数,GET和POST请求的编写方式一致。
如果要使用不同的方式接收请求,可以修改@RequestMapping注解:
1@RequestMapping(value = "/save", method = RequestMethod.GET)
普通参数
 1@Controller
 2@RequestMapping("/user")
 3public class UserController {
 4
 5    // 使用 [http://localhost/user/hello?name=张三] 访问
 6    // 返回响应体 Hello 张三!
 7    @RequestMapping("/hello")
 8    @ResponseBody
 9    public String hello(String name) {
10        return "Hello " + name + "!";
11    }
12
13    // 使用 [http://localhost/user/login?name=张三&password=abc] 访问
14    // 返回响应体 OK,终端输出 userName=张三; password=abc
15    @RequestMapping("/login")
16    @ResponseBody
17    public String login(@RequestParam("name") String userName, String password) {
18        System.out.println("userName=" + userName + "; password=" + password);
19        return "OK";
20    }
21
22}
请求参数:
定义相同的Query参数名与方法形参变量名即可接收参数。
如果想要形参名与Query参数名不同则可使用
@RequestParam注解定义Query参数名。如果有多个请求参数则定义多个方法参数。
返回值:
返回值使用
@ResponseBody注解后直接在方法中使用return返回。这里注解@ResponseBody是指将返回值作为响应体。
POJO类型参数
使用POJO类型接收参数,只需要让请求参数名与形参对象属性名相同即可。如果有嵌套的POJO参数,请求参数名与形参对象属性名相同,然后按照对象层次结构关系即可接收。
定义一个POJO类:
1public class Address {
2    private String province;
3    private String city;
4
5    // setter、getter and toString...
6}
1public class User {
2    private Integer id;
3    private String name;
4    private String password;
5    private Address address;
6
7    // setter、getter and toString...
8}
Controller:
 1@Controller
 2@RequestMapping("/user")
 3public class UserController {
 4
 5    // 访问 [http://localhost/user/login?id=123&password=abc&name=张三&address.province=广东&address.city=广州]
 6    // 返回响应体 OK,终端输出 Login: User{id=123, name='张三', password='abc', address=Address{province='广东', city='广州'}}
 7    @RequestMapping("/login")
 8    @ResponseBody
 9    public String login(User user) {
10        System.out.println("Login: " + user);
11        return "OK";
12    }
13
14}
数组、集合类型参数
接收数组参数只需让请求参数名与形参名相同且请求参数为多个即可(形参为数组类型)。
 1@Controller
 2@RequestMapping("/user")
 3public class UserController {
 4
 5    // 访问 [http://localhost/user/setHobbies?id=123&hobbies=唱歌,跳舞,Rap,打篮球]
 6    // 返回响应体 OK,终端输出 User 123's hobbyies: [唱歌, 跳舞, Rap, 打篮球]
 7    @RequestMapping("/setHobbies")
 8    @ResponseBody
 9    public String setHobbies(Integer id, String[] hobbies) {
10        System.out.println("User " + id + "'s hobbies: " + Arrays.toString(hobbies));
11        return "OK";
12    }
13
14}
使用集合类型形参接收参数,使用方式与数组不同(会报错)。因为SpringMVC将List看做是一个POJO对象来处理,将其创建一个对象并准备把前端的数据封装到对象中,但是List是一个接口无法创建对象。
使用集合类型形参接收参数需要使用@RequestParam绑定参数关系。
 1@Controller
 2@RequestMapping("/user")
 3public class UserController {
 4
 5    // 访问方式与数组形式相同,响应体与终端输出也相同
 6    @RequestMapping("/setHobbies")
 7    @ResponseBody
 8    public String setHobbies(Integer id, @RequestParam List<String> hobbies) {
 9        System.out.println("User " + id + "'s hobbies: " + hobbies);
10        return "OK";
11    }
12
13}
日期格式
使用@DateTimeFormat可以设置参数的日期格式,如:
 1@Controller
 2@RequestMapping("/user")
 3public class UserController {
 4
 5    // URL: http://localhost/user/setBirthday?id=123&birthday=2023/1/1 18:23:40
 6    @RequestMapping("/setBirthday")
 7    @ResponseBody
 8    public String setBirthday(Integer id, @DateTimeFormat(pattern = "yyyy/MM/dd HH:mm:ss") Date birthday) {
 9        System.out.println("User " + id + "'s birthday is " + birthday);
10        return "OK";
11    }
12
13}
JSON 数据参数
使用JSON传输需要添加相应依赖。SpringMVC默认使用的是jackson来处理json的转换:
1<dependency>
2    <groupId>com.fasterxml.jackson.core</groupId>
3    <artifactId>jackson-databind</artifactId>
4    <version>2.9.0</version>
5</dependency>
在配置类中添加@EnableWebMvc注解来开启JSON数据类型自动转换:
1@Configuration
2@ComponentScan("com.linner.controller")
3@EnableWebMvc // 开启JSON数据类型自动转换
4public class SpringMvcConfig {
5}
使用JSON传输数据只需要在形参前添加@ResponseBody注解来将外部传递的JSON数据映射到形参到对象中:
 1@Controller
 2@RequestMapping("/user")
 3public class UserController {
 4
 5    @RequestMapping("/login")
 6    @ResponseBody
 7    public String login(@RequestBody User user) {
 8        System.out.println("Login: " + user);
 9        return "OK";
10    }
11
12    @RequestMapping("/setHobbies")
13    @ResponseBody
14    public String setHobbies(Integer id, @RequestBody List<String> /* 也可以使用 String[] */ hobbies) {
15        System.out.println("User " + id + "'s hobbies: " + hobbies);
16        return "OK";
17    }
18
19}
login():URL:
http://localhost/user/loginJSON:
1{ 2 "id": 123, 3 "name": "张三", 4 "password": "123", 5 "address": { 6 "province": "广东", 7 "city": "广州" 8 } 9}setHobbies:URL:
http://localhost/user/setHobbies2?id=123JSON:
1["唱歌", "跳舞", "Rap", "打篮球"]
响应 JSON 数据
响应JSON数据需要依赖于@ResponseBody(在Controller中)和@EnableWebMvc(在配置类中)注解。将返回值设置为实体类对象,设置返回值类型为实体类类型,即可实现返回对应对象的JSON数据:
实体类:
1public class Book {
2    private Integer id;
3    private String name;
4    // constructor、setter、getter and toString ...
5}
Controller:
 1@Controller
 2@RequestMapping("/books")
 3public class BookController {
 4
 5    @RequestMapping("/search")
 6    @ResponseBody
 7    public Book search(int id) {
 8        return new Book(id, "Hello SpringMVC");
 9    }
10
11    @RequestMapping("/searchName")
12    @ResponseBody
13    public List<Book> searchName(String name) {
14        System.out.println("Search the book " + name);
15        List books = new ArrayList<Book>();
16        for (int i = 0; i < 5; i++) {
17            books.add(new Book(i, name + Integer.toString(i)));
18        }
19        return books;
20    }
21
22}
searchName():URL:
http://localhost/books/searchName?name=SpringMVC返回JOSN:1[ 2 { 3 "id": 0, 4 "name": "SpringMVC0" 5 }, 6 { 7 "id": 1, 8 "name": "SpringMVC1" 9 }, 10 { 11 "id": 2, 12 "name": "SpringMVC2" 13 }, 14 { 15 "id": 3, 16 "name": "SpringMVC3" 17 }, 18 { 19 "id": 4, 20 "name": "SpringMVC4" 21 } 22]search():URL:
http://localhost/books/search?id=123返回JSON:1{ 2 "id": 123, 3 "name": "SpringMVC" 4}
Ant 风格路径
在Ant风格中,定义了以下几种符号:
?:表示匹配请求资源目录中的任意单个字符。*:表示匹配请求资源目录中的任意0个或多个字符。/**/:表示匹配请求路径中任意一层或多层目录。例如/**/user可以匹配/abc/user、/abc/def/user等等。
REST 风格
REST(Representational State Transfer,表现形式状态转换),是一种软件架构风格。REST的优点有:
- 隐藏资源的访问行为,无法通过地址得知对资源是何种操作。
- 简化书写。
按照REST风格访问资源时使用行为动作区分对资源进行了何种操作:
- GET:查询;
- POST:新增。
- PUT:修改。
- DELETE:删除。
如:
http://localhost/users—— GET:查询全部用户信息(查询)。
http://localhost/users/1—— GET:查询指定用户(id为1)信息(查询)。http://localhost/users—— POST:添加用户信息(新增/保存)。http://localhost/users—— PUT:修改用户信息(修改/更新)。http://localhost/users/1—— DELETE:删除用户信息(删除)。
描述模块的名称通常使用复数,表示此类资源,而非单个资源。
Example:
 1@Controller
 2@RequestMapping("/users")
 3public class UserController {
 4
 5    /**
 6     * 添加用户
 7     */
 8    @RequestMapping(method = RequestMethod.POST)
 9    @ResponseBody
10    public String save(@RequestBody User user) {
11        return "OK";
12    }
13
14    /**
15     * 删除用户
16     */
17    @RequestMapping(value = "/{id}", method = RequestMethod.DELETE)
18    @ResponseBody
19    public String delete(@PathVariable int id) {
20        return "OK";
21    }
22
23    /**
24     * 修改用户
25     */
26    @RequestMapping(method = RequestMethod.PUT)
27    @ResponseBody
28    public String update(@RequestBody User user) {
29        return "OK";
30    }
31
32    /**
33     * 根据用户id查询
34     */
35    @RequestMapping(value = "/{id}", method = RequestMethod.GET)
36    @ResponseBody
37    public String searchById(@PathVariable int id) {
38        return "OK";
39    }
40
41    /**
42     * 查询所有用户
43     */
44    @RequestMapping(method = RequestMethod.GET)
45    @ResponseBody
46    public String searchAll() {
47        return "OK";
48    }
49}
上方Controller中每个方法的@RequestMapping中都使用了method元素来确定请求方式。并且根据需要save()和update()都接收一个JSON数据。
delete()和searchById()都使用了路径参数(value = "\{id}")。指定路径参数后,需要在方法参数列表中添加名称相同的参数,并且用@PathVariable注解(public String delete(@PathVariable int id))。
路径参数可以定义多个,如:
1@RequestMapping(value = "/{id}/{name}", method = RequestMethod.GET)
2@ResponseBody
3public String searchById(@PathVariable int id, @PathVariable String name) {
4    return "OK";
5}
如果想要路径参数名与形参名不同,需要在@PathVariable中注明对应关系,如:
1@RequestMapping(value = "/{id}", method = RequestMethod.DELETE)
2@ResponseBody
3public String delete(@PathVariable("id") int userId) {
4    return "OK";
5}
RESTful 快速开发
使用
@RestController注解:将
@ResponseBody注解提到类上,让所有的方法都有@ResponseBody的功能。@RestController注解正好相当于@Controller加上@ResponseBody的功能,所以可以使用@RestController替代它们。使用
@GetMapping、@PostMapping、@PutMapping、@DeleteMapping等替代@RequestMapping。例如
@GetMapping就相当于RequestMapping(method = RequestMethod.GET)。
Example:
 1@RestController
 2@RequestMapping("/books")
 3public class BookController {
 4
 5    /**
 6     * 搜索全部书籍
 7     */
 8    @GetMapping
 9    public String getAll() {
10        return "All Books";
11    }
12
13    /**
14     * 搜索图书
15     */
16    @GetMapping("/{id}")
17    public String getById(@PathVariable int id) {
18        return "Get by id " + id;
19    }
20
21    /**
22     * 保存图书
23     */
24    @PostMapping
25    public String save(@RequestBody Book book) {
26        return "Save " + book.toString();
27    }
28
29    /**
30     * 修改图书
31     */
32    @PutMapping
33    public String update(@RequestBody Book book) {
34        return "Update " + book.toString();
35    }
36
37    /**
38     * 删除图书
39     */
40    @DeleteMapping("/{id}")
41    public String delete(@PathVariable int id) {
42        return "Delete by id" + id;
43    }
44
45}
Params 请求参数映射匹配
params是@RequestMapping中的一个属性,该属性通过请求的请求参数匹配请求映射。
用法如下:
"param":请求映射所匹配的请求必须携带param这个请求参数。例如:
1@RequestMapping(value = {"login"}, params = "username")请求路径示例:
1http://localhost/login?username=zhangsan"!param":否定匹配,请求映射所匹配的请求必须不能携带param请求参数。例如:
1@RequestMapping(value = {"login"}, params = "!username")如果请求路径中包含参数
username将不会匹配到该@RequestMapping。"param=value":等值匹配,请求映射所匹配的请求必须携带param请求参数,且param参数的值必须为value。例如:
1@RequestMapping(value = {"login"}, params = "username=admin")请求路径为:
1http://localhost/login?username=admin"param!=value":非值匹配,请求映射所匹配的请求必须携带param请求参数,但param的值不能为value。例如:
1@RequestMapping(value = {"login"}, params = "username!=admin")如果请求路径携带参数
username且值为admin则匹配失败。{expression1[, expression2[, ...]]}:params是字符串数组类型,可以指定多个参数规则,其中expression可以是以上任何类型的字符串表达式中的任何一种。
params只对其指定的参数有要求,没有被其指定的参数并没有任何限制。
如果请求的路径和方式都满足@RequestMapping,但是与params指定的规则不付,如果此时没有其它映射来匹配这个请求,服务器会返回给浏览器400错误。
headers 请求头匹配
headers是@RequestMapping的属性,它指定请求的请求头信息匹配规则。
headers的字符串表达式语法与params十分相似:
"header":请求映射所匹配的请求必须携带header请求头信息。"!header":请求映射所匹配的请求必须不能携带header请求头信息。"header=value":请求映射所匹配的请求必须携带header请求头信息且header=value。请求头中使用的是
:分隔开的键值对,:左边是键(即上述中的header),右边是值(即上述中的value)。只需要将:替换为=即是对应的headers字符串表达式。"header!=value":要求请求映射所匹配的请求必须携带header请求头信息且header!=value。{expression1[, expression2[, ...]]}:headers属性同样是字符串数组类型,可以在{}中使用上述任何表达式。
当@RequestMapping其它条件都满足,除了headers时,服务器会返回404错误。
域对象共享数据
request域对象共享数据的常用方式大致有5种:
- 通过
ServletAPI获取(不建议使用)。即通过ServletRequest或HttpServletRequest对象获取request域。 - 通过
ModelAndView获取。 - 通过
Model获取。 - 通过
Map<String, Object>获取。 - 通过
ModelMap获取。
ServletAPI
获取request域对象共享数据的方式之一就是使用ServletAPI。即,在Controller对象中的映射方法中,添加一个ServletRequest或HttpServletRequest对象参数。
例如:
1@RequestMapping("/testServletAPI")
2@ResponseBody
3public String testServletAPI(HttpServletRequest request) {
4    request.setAttribute("testScope", "Hello ServletAPI!");
5    return testRequestScope;
6}
获取
response也是类似的方法。在参数列表中指定一个ServletResponse或HttpServletResponse对象参数。
Model
Model是SpringMVC提供的专用于共享request域对象数据。
使用Model的方式与使用ServletAPI类似,在形参列表中指定一个Model类型的参数即可。
 1@RequestMapping("/testModel")
 2@ResponseBody
 3public String testModel(Model model) {
 4    // 写入
 5    model.addAttribute("testRequestScope", "Hello Model!");
 6    // 读取
 7    String testRequestScope = (String) model.getAttribute("testRequestScope");
 8    System.out.println(testRequestScope);
 9
10    return testRequestScope;
11}
Map String Object
使用Map<String, Object>共享request域对象数据,使用方式也是在形参列表中定义一个Map<String, Object>类型形参。
 1@RequestMapping("/testMap")
 2@ResponseBody
 3public String testMap(Map<String, Object> map) {
 4    // 写入
 5    map.put("testRequestScope", "Hello Map!");
 6    // 读取
 7    String testRequestScope = (String) map.get("testRequestScope");
 8    System.out.println(testRequestScope);
 9
10    return testRequestScope;
11}
ModelMap
ModelMap的用法与Map十分类似。
 1@RequestMapping("/testModelMap")
 2@ResponseBody
 3public String testModelMap(ModelMap modelMap) {
 4    // 写入
 5    modelMap.addAttribute("testRequestScope", "Hello ModelMap!");
 6    // 读取
 7    String testRequestScope = (String) modelMap.getAttribute("testRequestScope");
 8    System.out.println(testRequestScope);
 9
10    return testRequestScope;
11}
ModelAndView
ModelAndView是SpringMVC提供的用于共享request域对象数据和视图解析跳转的API。
通过ModelAndView共享request域数据,无需在形参中指定该类型参数,只需在方法中new一个即可。但是使用ModelAndView需要将该类型对象作为返回值返回。
除了使用原生ServletAPI之外,使用其它方法(如上Map、Model、ModelMap等)共享request域数据,最终SpringMVC都会将模型数据和视图封装到ModelAndView中。
 1@RequestMapping("/testModelAndView")
 2public ModelAndView testModelAndView() {
 3    ModelAndView mav = new ModelAndView();
 4    // 处理模型数据,即向请求域request共享数据
 5    mav.addObject("testRequestScope", "Hello ModelAndView!");
 6    // 设置视图名称(返回视图需要有对应的页面)
 7    mav.setViewName("success");
 8    // 读取数据(第一次写入后可能读取失败,因为只有在方法执行完毕后才能真正写入)
 9    String testRequestScope = (String) mav.getModel().get("testRequestScope");
10    System.out.println(testRequestScope);
11
12    return mav;
13}
success.html(在Webapp/WEB-INF/templates/下创建):
 1<!DOCTYPE html>
 2<html lang="zh">
 3    <head>
 4        <meta charset="UTF-8">
 5        <title>Success!</title>
 6    </head>
 7    <body>
 8        <h1>Success!</h1>
 9    </body>
10</html>
其实
ModelAndView也可以作为Controller方法的参数使用。需要注意的是,使用
ModelAndView设置视图对象无论是否使用@ResponseBody,返回的始终是视图。
Map、Model 和 ModelMap
在使用Map<String, Object>、Model和ModelMap时SpringMVC传入的都是BindingAwareModelMap类型对象。
Model是一个接口,它定义了addAllAttributes()、getAttribute()等接口方法。ModelMap继承了LinkedHashMap<String, Object>,所以它也是属于Map的子类。ModelMap给出了addAllAttributes()、getAttribute()等接口的实现。BindingAwareModelMap继承自ExtendedModelMap类,而ExtendedModelMap又是ModelMap的子类和Model接口的实现。1public class ExtendedModelMap extends ModelMap implements Model { 2 /* ... */ 3}BindingAwareModelMap重写了Map的put()和putAll(),使得它能作为Map来读写request域。
综上,BindingAwareModelMap可以作为Model、Map<String, Object>和ModelMap传入Controller方法中。
在浏览器发送请求后,实际上调用Controller中对应方法的是DispatcherServlet中的doDispatch():
 1protected void doDispatch(HttpServletRequest request, HttpServletResponse response) throws Exception {
 2
 3    /* ... */
 4
 5    try {
 6        ModelAndView mv = null;
 7        /* ... */
 8
 9        try {
10
11            /* ... */
12
13            // Actually invoke the handler.(实际的请求处理者)
14            mv = ha.handle(processedRequest, response, mappedHandler.getHandler());
15            // 最后返回一个封装好的ModelAndView对象
16
17            /* ... */
18
19        }
20
21        /* ... */
22
23        processDispatchResult(processedRequest, response, mappedHandler, mv, dispatchException);
24
25    }/* ... */
26
27    /* ... */
28
29}
通过断点调试最后发现,无论是
Map、Model、ModelMap还是ModelAndView,它们最后都会被封装为ModelAndView(即使Controller方法返回的是ModelAndView,Controller方法中的ModelAndView和DispatcherServlet对象的doDispatch()中的ModelAndView地址也并不相同)。
在
processDispatchResult()中调用了下方所示方法来进行视图渲染:1render(mv, request, response);
向 Session 域共享数据
使用原生ServletAPI共享:
 1@RequestMapping("/testSession")
 2@ResponseBody
 3public String testSession(HttpSession session) {
 4    // 写入
 5    session.setAttribute("testSessionScope", "Hello Session!");
 6    // 读取
 7    String testSessionScope = (String) session.getAttribute("testSessionScope");
 8    System.out.println(testSessionScope);
 9    return testSessionScope;
10}
Session可以从Request域中获取:
 1@RequestMapping("/testSessionInServlet")
 2@ResponseBody
 3public String testSession(HttpServletRequest request) {
 4    // 从Request域中获取Session
 5    HttpSession session = request.getSession();
 6    // 写入
 7    session.setAttribute("testSessionScope", "Hello Session In Servlet!");
 8    // 读取
 9    String testSessionScope = (String) session.getAttribute("testSessionScope");
10    System.out.println(testSessionScope);
11    return testSessionScope;
12}
向 Application 域共享数据
通过Session域获取ServletContext:
 1@RequestMapping("/testApplication")
 2@ResponseBody
 3public String testApplication(HttpSession session) {
 4    // 从Session域中获取ServletContext
 5    ServletContext application = session.getServletContext();
 6    // 写入
 7    application.setAttribute("testSessionScope", "Hello Application!");
 8    // 读取
 9    String testSessionScope = (String) application.getAttribute("testSessionScope");
10    System.out.println(testSessionScope);
11
12    return testSessionScope;
13}
通过Request域获取ServletContext(不推荐):
 1@RequestMapping("/testApplicationInServlet")
 2@ResponseBody
 3public String testApplication(HttpServletRequest request) {
 4    // 从Request域中获取ServletContext
 5    ServletContext application = request.getServletContext();
 6    // 写入
 7    application.setAttribute("testSessionScope", "Hello Application In Servlet !");
 8    // 读取
 9    String testSessionScope = (String) application.getAttribute("testSessionScope");
10    System.out.println(testSessionScope);
11
12    return testSessionScope;
13}
请求报文转换
HttpMessageConverter即报文信息转换器,能将请求报文转换为Java对象,或将Java对象转换为响应报文
HttpMessageConverter提供了两个注解和两个类型:
@ResponseBody:即上方Controller方法中使用的将返回值(Java对象)作为响应体发送给浏览器的注解。ResponseEntity:可以作为Controller方法的返回值返回,并响应给浏览器。@RequestBody:将Controller方法形参指定为请求体,并接收从浏览器发送过来的请求体。1@PostMapping("/testRequestBody") 2@ResponseBody 3public String testRequestBody(@RequestBody String requestBody) { 4 requestBody = "RequestBody{'" + requestBody + "'}"; 5 return requestBody; 6}RequestEntity:是封装请求报文的一种类型,在Controller方法形参中使用,它获得的是整个请求报文。1@RequestMapping("/testRequestEntity") 2@ResponseBody 3public String testRequestEntity(RequestEntity<String> requestEntity) { 4 HttpHeaders headers = requestEntity.getHeaders(); 5 String body = requestEntity.getBody(); 6 String response = "RequestEntity{" + headers + 7 "}\nRequestBody{'" + body + "'}"; 8 System.out.println(response); 9 10 return response; 11}
往响应体写入信息还有一个方法,就是使用原生ServletAPI:
1@RequestMapping("/testResponse")
2public void testResponse(HttpServletResponse response) throws IOException {
3    response.getWriter().print("Hello Response!");
4}
文件上传下载
1<dependency>
2  <groupId>commons-fileupload</groupId>
3  <artifactId>commons-fileupload</artifactId>
4  <version>1.3.1</version>
5</dependency>
ResponseEntity 实现下载
将ResponseEntity<byte[]>作为返回值,在其中设置好对应的响应头、响应体和状态码。
 1@RequestMapping("/testDown")
 2public ResponseEntity<byte[]> testResponseEntity(HttpSession session) throws IOException {
 3    // 获取ServletContext对象
 4    ServletContext servletContext = session.getServletContext();
 5    // 获取服务器中文件的真实路径 getRealPath()如果不带参数的话获取的是服务器的部署路径
 6    String realPath = servletContext.getRealPath("/static/img/test.png");
 7    System.out.println("RealPath: " + realPath);
 8    // 创建输入流
 9    FileInputStream is = new FileInputStream(realPath);
10    // 创建字节数组
11    byte[] bytes = new byte[is.available()];
12    // 将流写到字节数组中
13    is.read(bytes);
14    // 创建HttpHeaders对象设置响应头信息
15    MultiValueMap<String, String> headers = new HttpHeaders();
16    // 设置下载方式以及下载文件的名字
17    headers.add("Content-Disposition", "attachment;filename=test.png");
18    // 设置响应状态码
19    HttpStatus statusCode = HttpStatus.OK;
20    // 创建ResponseEntity对象
21    ResponseEntity<byte[]> responseEntity = new ResponseEntity<>(bytes, headers, statusCode);
22    // 关闭输入流
23    is.close();
24
25    return responseEntity;
26}
在下载文件之前,需要通过Session获取当前要下载文件的真实路径:
1ServletContext servletContext = session.getServletContext();
2String realPath = servletContext.getRealPath("/static/img/test.png");
获取了真实路径后,通过FileInputStream将文件读取并写入字节数组byte[]中:
1FileInputStream is = new FileInputStream(realPath);
2byte[] bytes = new byte[is.available()];
3is.read(bytes);
4is.close();
下载文件时,需要在响应头中设置下载方式以及文件名:
1MultiValueMap<String, String> headers = new HttpHeaders();
2// 以附件方式下载文件,并且默认文件名为test.png
3headers.add("Content-Disposition", "attachment;filename=test.png");
最后将字节数组作为响应体,再加上响应头和状态码等信息,创建ResponseEntity:
1ResponseEntity<byte[]> responseEntity = new ResponseEntity<>(bytes, headers, statusCode);
2return responseEntity;
文件上传
文件上传依赖:
1<dependency>
2    <groupId>commons-fileupload</groupId>
3    <artifactId>commons-fileupload</artifactId>
4    <version>1.3.1</version>
5</dependency>
在springMVC.xml中配置文件上传解析器:
1<!-- 配置文件上传解析器,将上传的文件封装为MultipartFile -->
2<bean id="multipartResolver" class="org.springframework.web.multipart.commons.CommonsMultipartResolver"/>
文件上传实现:
 1@PostMapping("/testUp")
 2@ResponseBody
 3public String testUp(MultipartFile photo, HttpSession session) throws IOException {
 4    // 获取上传文件的文件名
 5    String fileName = photo.getOriginalFilename();
 6    // 获取上传文件的后缀名
 7    String suffixName = fileName.substring(fileName.lastIndexOf("."));
 8    // 将UUID作为文件名
 9    String uuid = UUID.randomUUID().toString();
10    // 将UUID和后缀名拼接后的结果作为最终的文件名
11    fileName = uuid + suffixName;
12    // 需要通过 ServletContext 获取服务器中 photo 目录的路径
13    ServletContext servletContext = session.getServletContext();
14    // photo 其实也可以用 photo.getName() 替代
15    String photoPath = servletContext.getRealPath("photo");
16    File file = new File(photoPath);
17    // 判断photoPath所对应路径是否存在
18    if (!file.exists()) {
19        // 若不存在,则创建目录
20        file.mkdir();
21    }
22    String finalPath = photoPath + File.separator + fileName;
23    photo.transferTo(new File(finalPath));
24    return fileName + " OK!";
25}
在上传文件时,需要考虑文件之间文件名的冲突问题,可以通过将文件名改为UUID解决:
1// 获取上传文件的文件名
2String fileName = photo.getOriginalFilename();
3// 获取上传文件的后缀名
4String suffixName = fileName.substring(fileName.lastIndexOf("."));
5// 将UUID作为文件名
6String uuid = UUID.randomUUID().toString();
7// 将UUID和后缀名拼接后的结果作为最终的文件名
8fileName = uuid + suffixName;
拦截器
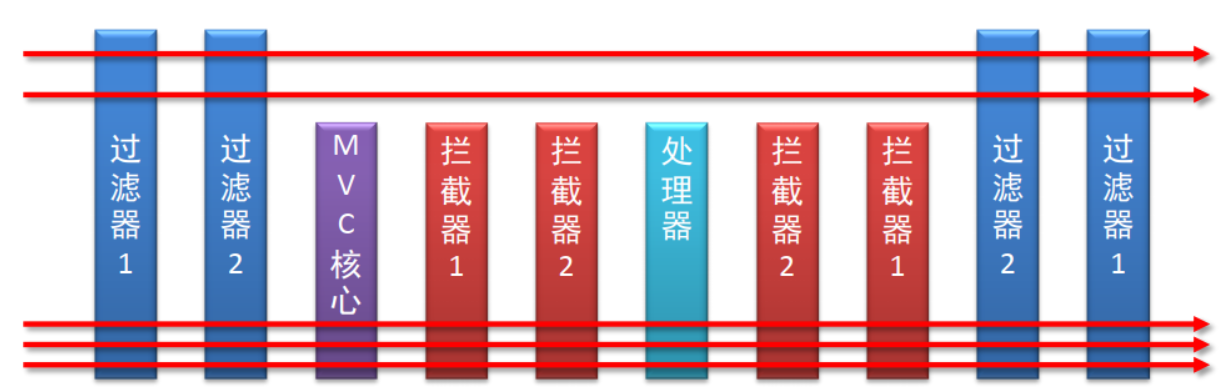
拦截器(Interceptor)是一种动态拦截方法调用的机制,在SpringMVC中动态拦截控制器方法的执行。拦截器可以在指定的发那个发调用前后执行预先设定的代码,可以阻止原始方法的执行。拦截器和过滤器在作用和执行顺序上很相似。它们的关系如下图所示:
创建拦截器类:
 1@Component  // 由SpringMVC来管理
 2public class BookInterceptor implements HandlerInterceptor {
 3    @Override
 4    public boolean preHandle(HttpServletRequest request, HttpServletResponse response, Object handler) throws Exception {
 5        System.out.println("preHandle...");
 6        return true;
 7    }
 8
 9    @Override
10    public void postHandle(HttpServletRequest request, HttpServletResponse response, Object handler, ModelAndView modelAndView) throws Exception {
11        System.out.println("postHandle...");
12    }
13
14    @Override
15    public void afterCompletion(HttpServletRequest request, HttpServletResponse response, Object handler, Exception ex) throws Exception {
16        System.out.println("afterCompletion...");
17    }
18}
拦截器配置类
编写拦截器配置类有两种方式:
- 实现
WebMvcConfigurer接口; - 继承
WebMvcConfigurationSupport类并重写方法。
 1@Configuration
 2// 扫描interceptor包
 3@ComponentScan("com.linner.interceptor")
 4public class SpringMvcSupport extends WebMvcConfigurationSupport {
 5    @Autowired  // 自动装配
 6    private BookInterceptor bookInterceptor;
 7
 8    @Override
 9    protected void addInterceptors(InterceptorRegistry registry) {
10        /*
11            添加(声明)拦截器并配置拦截规则
12            可以同时配置多个规则
13            如果不添加拦截规则,默认拦截所有请求
14        */
15        registry.addInterceptor(bookInterceptor).addPathPatterns("/books", "/books/*");
16    }
17}
让SpringMVC扫描到拦截器的配置类:
1@Configuration
2@ComponentScan({"com.linner.controller", "com.linner.config"})
3@EnableWebMvc
4public class SpringMvcConfig {}
拦截器的配置类SpingMvcSupport可以书写在SpringMvcConfig中,以简化书写(并演示继承WebMvcConfigurer编写拦截器配置类):
 1@Configuration
 2@ComponentScan({"com.linner.controller", "com.linner.interceptor"})
 3@EnableWebMvc
 4public class SpringMvcConfig implements WebMvcConfigurer {
 5    @Autowired
 6    private BookInterceptor bookInterceptor;
 7
 8    @Override
 9    public void addInterceptors(InterceptorRegistry registry) {
10        registry.addInterceptor(bookInterceptor).addPathPatterns("/books", "/books/*");
11    }
12}
拦截器执行过程
运行程序,发送books开头的请求(如http://localhost/books),终端会有如下输出:
1preHandle...
2getAll...
3postHandle...
4afterCompletion...
拦截器的执行顺序如下:
- 执行
preHandle()。preHandle()返回值为true:- 执行请求路径相应的方法或下一个拦截器的
preHandle()。 - 判断是否执行
postHandle():- Controller被执行(后续拦截器链中没有一个
preHandle()返回值为false),执行postHandle()。 - Controller没有被执行(后续拦截器链中存在一个
preHandle()返回值为false),不执行postHandle()。
- Controller被执行(后续拦截器链中没有一个
- 执行
afterCompletion()。
- 执行请求路径相应的方法或下一个拦截器的
preHandle()返回值为false。
- 结束。
当配置多个拦截器时,形成拦截器链。多个preHandle()按照Interceptor被声明顺序执行;多个postHandle()按照Interceptor被声明顺序逆序执行。即,拦截器链的运行顺序以拦截器添加顺序为准。
当拦截器中出现对原始处理器的拦截,后面的拦截器均终止运行。当拦截器运行中断,仅运行配置在前面的拦截器的afterCompletion()操作(afterCompletion()代表当前拦截器执行完成,与后续拦截器链中preHandle()的返回值和Controller是否被执行无关)。
假设现在有如下两个拦截器:
 1@Component
 2public class FirstInterceptor implements HandlerInterceptor {
 3    @Override
 4    public boolean preHandle(HttpServletRequest request, HttpServletResponse response, Object handler) throws Exception {
 5        System.out.println("FirstInterceptor preHandle...");
 6        return true;
 7    }
 8
 9    @Override
10    public void postHandle(HttpServletRequest request, HttpServletResponse response, Object handler, ModelAndView modelAndView) throws Exception {
11        System.out.println("FirstInterceptor postHandle...");
12    }
13
14    @Override
15    public void afterCompletion(HttpServletRequest request, HttpServletResponse response, Object handler, Exception ex) throws Exception {
16        System.out.println("FirstInterceptor afterCompletion...");
17    }
18}
 1@Component
 2public class LaterInterceptor implements HandlerInterceptor {
 3    @Override
 4    public boolean preHandle(HttpServletRequest request, HttpServletResponse response, Object handler) throws Exception {
 5        System.out.println("LaterInterceptor preHandle...");
 6        return true;
 7    }
 8
 9    @Override
10    public void postHandle(HttpServletRequest request, HttpServletResponse response, Object handler, ModelAndView modelAndView) throws Exception {
11        System.out.println("LaterInterceptor postHandle...");
12    }
13
14    @Override
15    public void afterCompletion(HttpServletRequest request, HttpServletResponse response, Object handler, Exception ex) throws Exception {
16        System.out.println("LaterInterceptor afterCompletion...");
17    }
18}
它们在拦截器类中的添加顺序为:
 1@Autowired
 2private FirstInterceptor firstInterceptor;
 3@Autowired
 4private LaterInterceptor laterInterceptor;
 5
 6@Override
 7public void addInterceptors(InterceptorRegistry registry) {
 8    // 如果没有配置拦截路径,则默认拦截所有请求
 9    registry.addInterceptor(firstInterceptor);
10    regisrty.addInterceptor(laterInterceptor);
11}
访问任意资源后,终端输出:
1FirstInterceptor preHandle...
2LaterInterceptor preHandle...
3LaterInterceptor postHandle...
4FirstInterceptor postHandle...
5LaterInterceptor afterCompletion...
6FirstInterceptor afterCompletion...
实际上在DispatcherServlet的doDispatch()方法中,在执行mv = ha.handle(...)之前进行了一个条件判断:
 1protected void doDispatch(HttpServletRequest request, HttpServletResponse response) throws Exception {
 2    /* ... */
 3    // 拦截器链
 4    HandlerExecutionChain mappedHandler = null;
 5
 6    try {
 7        /* ... */
 8        try {
 9            /* ... */
10
11            // 获取拦截器链
12            mappedHandler = getHandler(processedRequest);
13            if (mappedHandler == null) {
14                noHandlerFound(processedRequest, response);
15                return;
16            }
17
18            /* ... */
19
20            // 执行相应Interceptor的preHandle
21            if (!mappedHandler.applyPreHandle(processedRequest, response)) {
22                return;
23            }
24
25            // Actually invoke the handler.
26            mv = ha.handle(processedRequest, response, mappedHandler.getHandler());
27
28            /* ... */
29
30            // 执行相应Interceptor的postHandle
31            mappedHandler.applyPostHandle(processedRequest, response, mv);
32
33            /* ... */
34        } catch /* ... */
35
36        // 处理调度结果
37        // 包含了ModelAndView的进一步处理(渲染视图、处理模型)、还有Interceptor的afterCompletion()调用等等
38        processDispatchResult(processedRequest, response, mappedHandler, mv, dispatchException);
39
40        /* ... */
41    }
42}
即HandlerExecutionChain(控制器执行链)对象的applyPreHandle()方法:
 1/**
 2 * preHandle执行链
 3 */
 4boolean applyPreHandle(HttpServletRequest request, HttpServletResponse response) throws Exception {
 5    // 读取interceptorList中的interceptor,并逐个执行它们的preHandle方法
 6    for (int i = 0; i < this.interceptorList.size(); i++) {
 7        // 获取interceptor
 8        HandlerInterceptor interceptor = this.interceptorList.get(i);
 9        // 执行interceptor.preHandle
10        // 如果有一个interceptor返回了false,则立即执行triggerAfterCompletion()并返回false
11        if (!interceptor.preHandle(request, response, this.handler)) {
12            triggerAfterCompletion(request, response, null);
13            return false;
14        }
15        // 记录拦截器链中返回false的前一个拦截器下标
16        this.interceptorIndex = i;
17    }
18    return true;
19}
applyPostHandle()方法:
 1/**
 2 * postHandle执行链
 3 */
 4void applyPostHandle(HttpServletRequest request, HttpServletResponse response, @Nullable ModelAndView mv)
 5        throws Exception {
 6    // 按照倒序,逐个执行interceptor.postHandle()
 7    for (int i = this.interceptorList.size() - 1; i >= 0; i--) {
 8        HandlerInterceptor interceptor = this.interceptorList.get(i);
 9        interceptor.postHandle(request, response, this.handler, mv);
10    }
11}
triggerAfterCompletion():
 1/**
 2 * afterCompletion执行链
 3 */
 4void triggerAfterCompletion(HttpServletRequest request, HttpServletResponse response, @Nullable Exception ex) {
 5    // 从interceptorIndex开始,倒序执行interceptor.afterCompletion()
 6    // 即triggerAfterCompletion()只会执行那些返回true的interceptor的afterCompletion()
 7    for (int i = this.interceptorIndex; i >= 0; i--) {
 8        HandlerInterceptor interceptor = this.interceptorList.get(i);
 9        try {
10            interceptor.afterCompletion(request, response, this.handler, ex);
11        }
12        catch (Throwable ex2) {
13            logger.error("HandlerInterceptor.afterCompletion threw exception", ex2);
14        }
15    }
16}
在一切正常运行完成后,调用Interceptor的afterCompletion()的情况有点复杂(DispatcherServlet中的processDispatchResult()):
 1private void processDispatchResult(HttpServletRequest request, HttpServletResponse response,
 2        @Nullable HandlerExecutionChain mappedHandler, @Nullable ModelAndView mv,
 3        @Nullable Exception exception) throws Exception {
 4
 5    /* ... */
 6
 7    // Did the handler return a view to render?
 8    if (mv != null && !mv.wasCleared()) {
 9        // 渲染视图
10        render(mv, request, response);
11        /* ... */
12    }
13
14    /* ... */
15
16    // 在处理完其它调度结果后,通过mappedHandler.triggerAfterCompletion()来调用interceptor.afterCompletion()
17    if (mappedHandler != null) {
18        // Exception (if any) is already handled..
19        mappedHandler.triggerAfterCompletion(request, response, null);
20    }
21}
在
DispatcherServlet的doDispatch()方法中还有许多try ... catch,当捕捉到异常时,doDispatch()也会通过triggerAfterCompletion()方法来调用mappedHandler.triggerAfterCompletion()。
更具上述代码总结出HandlerExecutionChain中的执行情况:
applyPreHandle():在执行Controller方法之前执行。applyPostHandle():执行了Controller方法之后执行。triggerAfterCompletion():两种执行情况:
- 执行
applyPreHandle()时,有一个拦截器返回了false; - 执行完
applyPostHandle()之后,且无错误时执行(即processDispatchResult()中的triggerAfterCompletion()); - 执行
applyPreHandle()、applyPostHandle()和Controller方法过程中,出现异常时执行(出现异常时是在DispatcherServlet的triggerAfterCompletion()中调用)。
- 执行
配置文件配置拦截器
除了使用配置类外,也可以使用配置文件的方式来配置拦截器。
使用<mvc:interceptors>来配置拦截器。添加拦截器的方式有两种,一种是使用<bean class="..."/>,另一种是使用<ref bean="..."/>,这两种方式本质上没有什么区别。
1<mvc:interceptors>
2    <bean class="asia.linner.interceptor.FirstInterceptor"/>
3    <!-- bean中指定的是Bean的默认id,即首字母小写的类名 -->
4    <ref bean="laterInterceptor"/>
5</mvc:interceptors>
在<mvc:interceptors>中可以使用<mvc:interceptor>来配置具体的拦截规则:
 1<mvc:interceptors>
 2    <mvc:interceptor>
 3        <!-- <mvc:mapping>: 拦截路径 -->
 4        <mvc:mapping path="/**"/>
 5        <!-- <mvc:exclude-mapping>: 排除路径(不拦截) -->
 6        <mvc:exclude-mapping path="/users"/>
 7        <mvc:exclude-mapping path="/users/**"/>
 8        <!-- 假设只有users和books这两个请求 -->
 9        <ref bean="bookInterceptor"/>
10    </mvc:interceptor>
11</mvc:interceptors>
静态资源处理器
 1@Configuration
 2public class SpringMvcSupport extends WebMvcConfigurationSupport {
 3    @Override
 4    protected void addResourceHandlers(ResourceHandlerRegistry registry) {
 5        // 放行单个目录(Webapp目录下)
 6        registry.addResourceHandler("/pages/**").addResourceLocations("/pages/");
 7        // 也可以将Webapp整个目录都添加:
 8        // registry.addResourceHandler("/**").addResourceLocations("classpath:/");
 9    }
10}
addResourceHandler():定义访问资源路径。addResourceLocations():定义访问路径时的静态资源目录。
异常处理
Spring MVC 自带了两个异常处理器分别是SimpleMappingExceptionResolver和DefaultHandlerExceptionResolver。
其中DefaultHandlerExceptionResolver是由Spring MVC定义的默认异常处理器,它的doResolveException()定义了一些常见的异常处理:
 1protected ModelAndView doResolveException(
 2        HttpServletRequest request, HttpServletResponse response, @Nullable Object handler, Exception ex) {
 3
 4    try {
 5        if (ex instanceof HttpRequestMethodNotSupportedException) {
 6            return handleHttpRequestMethodNotSupported(
 7                    (HttpRequestMethodNotSupportedException) ex, request, response, handler);
 8        }
 9        else if (ex instanceof HttpMediaTypeNotSupportedException) {
10            return handleHttpMediaTypeNotSupported(
11                    (HttpMediaTypeNotSupportedException) ex, request, response, handler);
12        }
13        else if (ex instanceof HttpMediaTypeNotAcceptableException) {
14            return handleHttpMediaTypeNotAcceptable(
15                    (HttpMediaTypeNotAcceptableException) ex, request, response, handler);
16        }
17        else if (ex instanceof MissingPathVariableException) {
18            return handleMissingPathVariable(
19                    (MissingPathVariableException) ex, request, response, handler);
20        }
21        else if (ex instanceof MissingServletRequestParameterException) {
22            return handleMissingServletRequestParameter(
23                    (MissingServletRequestParameterException) ex, request, response, handler);
24        }
25        else if (ex instanceof ServletRequestBindingException) {
26            return handleServletRequestBindingException(
27                    (ServletRequestBindingException) ex, request, response, handler);
28        }
29        else if (ex instanceof ConversionNotSupportedException) {
30            return handleConversionNotSupported(
31                    (ConversionNotSupportedException) ex, request, response, handler);
32        }
33        else if (ex instanceof TypeMismatchException) {
34            return handleTypeMismatch(
35                    (TypeMismatchException) ex, request, response, handler);
36        }
37        else if (ex instanceof HttpMessageNotReadableException) {
38            return handleHttpMessageNotReadable(
39                    (HttpMessageNotReadableException) ex, request, response, handler);
40        }
41        else if (ex instanceof HttpMessageNotWritableException) {
42            return handleHttpMessageNotWritable(
43                    (HttpMessageNotWritableException) ex, request, response, handler);
44        }
45        else if (ex instanceof MethodArgumentNotValidException) {
46            return handleMethodArgumentNotValidException(
47                    (MethodArgumentNotValidException) ex, request, response, handler);
48        }
49        else if (ex instanceof MissingServletRequestPartException) {
50            return handleMissingServletRequestPartException(
51                    (MissingServletRequestPartException) ex, request, response, handler);
52        }
53        else if (ex instanceof BindException) {
54            return handleBindException((BindException) ex, request, response, handler);
55        }
56        else if (ex instanceof NoHandlerFoundException) {
57            return handleNoHandlerFoundException(
58                    (NoHandlerFoundException) ex, request, response, handler);
59        }
60        else if (ex instanceof AsyncRequestTimeoutException) {
61            return handleAsyncRequestTimeoutException(
62                    (AsyncRequestTimeoutException) ex, request, response, handler);
63        }
64    }
65    catch (Exception handlerEx) {
66        if (logger.isWarnEnabled()) {
67            logger.warn("Failure while trying to resolve exception [" + ex.getClass().getName() + "]", handlerEx);
68        }
69    }
70    return null;
71}
SimpleMappingExceptionResolver是Spring MVC提供的自定义异常处理器。
基于配置的异常处理
在springMVC.xml中配置异常处理器:
 1<?xml version="1.0" encoding="UTF-8"?>
 2<beans>
 3
 4    <!-- ... -->
 5
 6    <!-- 配置异常处理 -->
 7    <bean class="org.springframework.web.servlet.handler.SimpleMappingExceptionResolver">
 8        <property name="exceptionMappings">
 9            <props>
10                <!--
11                    设置要处理的异常和返回的视图
12                    prop的key:表示处理器方法执行过程中出现的异常
13                    prop的值:表示若出现指定异常时,设置一个新的视图名称,跳转到指定页面
14                 -->
15                <prop key="java.lang.ArithmeticException">error</prop>
16            </props>
17        </property>
18        <!--
19            将异常信息共享在请求域中的键
20            exceptionAttribute设置一个属性名,将出现的异常信息在请求域中进行共享
21         -->
22        <property name="exceptionAttribute" value="ex"/>
23    </bean>
24
25</beans>
在相应路径(如/WEB-INF/templates/)下创建异常视图(如error.html):
 1<!DOCTYPE html>
 2<html lang="zh" xmlns:th="http://www.thymeleaf.org">
 3<head>
 4    <meta charset="UTF-8">
 5    <title>Error</title>
 6</head>
 7<body>
 8    <h1>出现异常</h1>
 9    <p th:text="${ex}"></p>
10</body>
11</html>
注:使用Thymeleaf管理Html视图,需要在
<html>标签中声明xmlns:th="http://www.thymeleaf.org"。
基于注解的异常处理
使用@ControllerAdvice标注在异常处理类上,这样的异常处理类与Controller类似。在类的方法上用@ExceptionHandler指定要处理的异常,@ExceptionHandler的value属性接收一个Class类型的数组,意味着可以同时处理多个异常。
 1@ControllerAdvice
 2public class ExceptionController {
 3
 4    @ExceptionHandler({
 5            ArithmeticException.class,
 6            NullPointerException.class
 7    })
 8    public String testException(
 9            Exception ex /* 当前出现的异常 */,
10            Model model) {
11
12        // 用Model设置属性,将异常信息返回
13        model.addAttribute("exception", ex);
14        return "error";
15    }
16}
在ExceptionController中用@ExceptionHandler标注的方法,在它的参数列表中定义一个Exception类型的参数,可用于获取当前处理的实际的异常。
重定向
Spring MVC默认的方式是forward(即转发),而要使用redirect需要在视图名称中添加redirect:说明。Spring MVC重定向有以下几种方式:
 1@Controller
 2public class TestController {
 3
 4    /**
 5     * 通过返回类型为String的方法,返回一个"redirect:..."的字符串进行重定向
 6     * @return 重定向的路径
 7     */
 8    @RequestMapping("/test1")
 9    public String test1() {
10        return "redirect:/index.html";
11    }
12
13    /**
14     * 通过ModelAndView设置视图名称为"redirect:..."
15     * @return
16     */
17    @RequestMapping("/test2")
18    public ModelAndView test2() {
19        return new ModelAndView("redirect:/test1");
20        // 相当于:
21        /*
22        ModelAndView mav = new ModelAndView();
23        mav.setViewName("redirect:/index");
24        return mav;
25        */
26    }
27
28    /**
29     * 通过原生ServletAPI
30     */
31    @RequestMapping("/test3")
32    public void test3(HttpServletResponse response) throws IOException {
33        response.sendRedirect("/test1");
34    }
35}
Spring MVC 执行流程
常用组件
DispatcherServlet:前端控制器,由框架提供。
作用:统一处理请求和响应,整个流程控制的中心,由它调用其它组件处理用户的请求。
Controller、Interceptor、HandlerExceptionResolver等等都由它来调用。
HandlerMapping:处理器映射器,由框架提供。
作用:根据请求的
url、method等信息查找相应的Handler(即控制器方法)。就是请求中的
@RequestMapping、@GetMapping、@PostMapping等等。将请求和控制器或控制器方法进行映射。Handler:处理器(控制器方法),由工程师开发。
作用:在DispatcherServlet的控制下,Handler对具体的用户请求进行处理。
HandlerAdapter:处理器适配器,由框架提供。
作用:通过HandlerAdapter执行处理器(控制器方法)。
由HandlerMapping找到对应的Handler,接着由HandlerAdapter执行对应的Handler。
ViewResolver:视图解析器,由框架提供。
作用:进行视图解析,得到相应的视图,例如:ThymeleafView、InternalResourceView(例如forward,即转发时)、RedirectView(例如redirect,即重定向时)。
Viw:视图,由框架或视图技术提供。
作用:将模型数据通过页面展示给用户。
DispatcherServlet 继承链
DispatcherServlet $\xrightarrow{extends}$ FrameworkServlet $\xrightarrow{extends}$ HttpServletBean $\xrightarrow{extends}$ HttpServlet $\xrightarrow{extends}$ GenericServlet $\xrightarrow{implements}$ Servlet
DispatcherServlet 初始化过程
DispatcherServlet初始化过程需要根据它的继承链,查找每个类或接口的init()方法。
Servlet.init(ServletConfig):1public void init(ServletConfig config) throws ServletException;GenericServlet:GenericServlet不仅实现了Servlet.init(ServletConfig)还给出了一个未实现的init()。init(ServletConfig config):1public void init(ServletConfig config) throws ServletException { 2 this.config = config; 3 this.init(); 4}init():1public void init() throws ServletException {}HttpServlet:HttpServlet并没有重写GenericServlet.init(ServletConfig)或GenericServlet.init()。HttpServletBean:HttpServletBean实现了GenericServlet.init()并且给出了一个未实现的initServletBean()。init():1@Override 2public final void init() throws ServletException { 3 4 // Set bean properties from init parameters. 5 /* ... */ 6 7 // Let subclasses do whatever initialization they like. 8 initServletBean(); 9}initServletBean():初始化ServletBean。1protected void initServletBean() throws ServletException {}FrameworkServlet:FrameworkServlet实现了HttpServletBean.initServletBean(),并且给出了initServletBean()的实现。initServletBean():1@Override 2protected final void initServletBean() throws ServletException { 3 4 /* ... */ 5 6 try { 7 // 初始化WebApplicationContext 8 this.webApplicationContext = initWebApplicationContext(); 9 initFrameworkServlet(); 10 } 11 /* catch ... */ 12 13 /* ... */ 14}initWebApplicationContext():初始化WebApplicationContext。1protected WebApplicationContext initWebApplicationContext() { 2 // 获取当前的WebApplicationContext 3 WebApplicationContext rootContext = 4 WebApplicationContextUtils.getWebApplicationContext(getServletContext()); 5 WebApplicationContext wac = null; 6 7 // 判断当前WebApplicationContext是否为空(第一次执行时恒为空) 8 if (this.webApplicationContext != null) { 9 // A context instance was injected at construction time -> use it 10 wac = this.webApplicationContext; 11 if (wac instanceof ConfigurableWebApplicationContext) { 12 ConfigurableWebApplicationContext cwac = (ConfigurableWebApplicationContext) wac; 13 if (!cwac.isActive()) { 14 // The context has not yet been refreshed -> provide services such as 15 // setting the parent context, setting the application context id, etc 16 if (cwac.getParent() == null) { 17 // The context instance was injected without an explicit parent -> set 18 // the root application context (if any; may be null) as the parent 19 cwac.setParent(rootContext); 20 } 21 // 装配并刷新WebApplicationContext 22 configureAndRefreshWebApplicationContext(cwac); 23 } 24 } 25 } 26 /* 27 如果wac为空则查找WebApplicationContext 28 (第一次执行完后wac还是为空,因为没有任何WebApplicationContext) 29 */ 30 if (wac == null) { 31 // No context instance was injected at construction time -> see if one 32 // has been registered in the servlet context. If one exists, it is assumed 33 // that the parent context (if any) has already been set and that the 34 // user has performed any initialization such as setting the context id 35 wac = findWebApplicationContext(); 36 } 37 // 如果wac为空则创建一个WebApplicationContext 38 if (wac == null) { 39 // No context instance is defined for this servlet -> create a local one 40 // 创建一个WebApplicationContext 41 wac = createWebApplicationContext(rootContext); 42 } 43 44 // 没有接收到刷新事件时 45 if (!this.refreshEventReceived) { 46 // Either the context is not a ConfigurableApplicationContext with refresh 47 // support or the context injected at construction time had already been 48 // refreshed -> trigger initial onRefresh manually here. 49 synchronized (this.onRefreshMonitor) { 50 // 刷新WebApplicationContext 51 onRefresh(wac); 52 } 53 } 54 55 if (this.publishContext) { 56 // Publish the context as a servlet context attribute. 57 // 将ServletContext作为属性,获取它的属性名 58 String attrName = getServletContextAttributeName(); 59 // 将IOC容器在应用域共享 60 getServletContext().setAttribute(attrName, wac); 61 } 62 63 return wac; 64}createWebApplicationContext(WebApplicationContext):通过WebApplicationContext创建WebApplicationContext。1protected WebApplicationContext createWebApplicationContext(@Nullable WebApplicationContext parent) { 2 return createWebApplicationContext((ApplicationContext) parent); 3}createWebApplicationContext(ApplicationContext):通过ApplicationContext创建WebApplicationContext。1protected WebApplicationContext createWebApplicationContext(@Nullable ApplicationContext parent) { 2 Class<?> contextClass = getContextClass(); 3 if (!ConfigurableWebApplicationContext.class.isAssignableFrom(contextClass)) { 4 throw new ApplicationContextException( 5 "Fatal initialization error in servlet with name '" + getServletName() + 6 "': custom WebApplicationContext class [" + contextClass.getName() + 7 "] is not of type ConfigurableWebApplicationContext"); 8 } 9 // Web IOC 容器对象(即SpringMVC IOC) 10 ConfigurableWebApplicationContext wac = 11 (ConfigurableWebApplicationContext) BeanUtils.instantiateClass(contextClass); 12 13 // 配置环境 14 wac.setEnvironment(getEnvironment()); 15 /* 16 整合Spring和SpringMVC时, 17 设置SpringMVC的父容器, 18 让Spring和SpringMVC的IOC容器能无缝衔接 19 SpringMVC IOC容器是Spring IOC容器的子容器 20 */ 21 wac.setParent(parent); 22 String configLocation = getContextConfigLocation(); 23 if (configLocation != null) { 24 wac.setConfigLocation(configLocation); 25 } 26 // 装配并刷新WebApplicationContext 27 configureAndRefreshWebApplicationContext(wac); 28 29 return wac; 30}onRefresh():刷新WebApplicationContext。1protected void onRefresh(ApplicationContext context) { 2 // For subclasses: do nothing by default. 3 // 由子类去实现 4}FrameworkServlete创建WebApplicationContext后,刷新容器,调用
onRefresh(wac),此方法在DispatcherServlet进行了重写(实现)。getServletContextAttributeName():1// FrameworkServlet的全类名.CONTEXT. 2public static final String SERVLET_CONTEXT_PREFIX = FrameworkServlet.class.getName() + ".CONTEXT."; 3 4public String getServletContextAttributeName() { 5 // 前缀+Servlet友好名称(即前缀 + <servlet-name>) 6 return SERVLET_CONTEXT_PREFIX + getServletName(); 7}DispatcherServlet:实现了
FrameworkServlet.onRefresh()。1@Override 2protected void onRefresh(ApplicationContext context) { 3 initStrategies(context); 4}initStrategies():DispatcherServlet初始化策略。1protected void initStrategies(ApplicationContext context) { 2 // 初始化多个解析器,例如文件上传解析器等 3 initMultipartResolver(context); 4 initLocaleResolver(context); 5 // 初始化模板解析器 6 initThemeResolver(context); 7 // 初始化处理器映射器 8 initHandlerMappings(context); 9 // 初始阿虎处理器适配器 10 initHandlerAdapters(context); 11 // 初始化异常处理器 12 initHandlerExceptionResolvers(context); 13 // 初始化转换器,将请求转换为视图名称 14 initRequestToViewNameTranslator(context); 15 // 初始化视图解析器 16 initViewResolvers(context); 17 initFlashMapManager(context); 18}
DispatcherServlet 请求处理过程
Servlet和GenericServlet:Servlet提供了service()接口,GenericServlet并未对其进行实现。service(ServletRequest, ServletResponse):1public void service(ServletRequest req, ServletResponse res) 2 throws ServletException, IOException;HttpServlet:service()由HttpServlet实现。并且HttpServlet还提供了service(HttpServletRequest, HttpServletResponse)。service(ServletRequest, ServletResponse):1@Override 2public void service(ServletRequest req, ServletResponse res) 3 throws ServletException, IOException { 4 5 HttpServletRequest request; 6 HttpServletResponse response; 7 8 if (!(req instanceof HttpServletRequest && 9 res instanceof HttpServletResponse)) { 10 throw new ServletException("non-HTTP request or response"); 11 } 12 13 // 转换为HttpServletRequest和HttpServletResponse 14 request = (HttpServletRequest) req; 15 response = (HttpServletResponse) res; 16 17 service(request, response); 18}HttpServlet.service(ServletRequest, ServletResponse)的主要作用就是将ServletRequest和ServletResponse分别转换为HttpServletRequest和HttpServletResponse,然后调用HttpServlet.service(HttpServletRequest, HttpServletResponse)。service(HttpServletRequest, HttpServletResponse):1protected void service(HttpServletRequest req, HttpServletResponse resp) 2 throws ServletException, IOException { 3 4 // 获取请求方式 5 String method = req.getMethod(); 6 7 // 请求的分发处理,根据请求方式调用相应方法(如调用doGet) 8 if (method.equals(METHOD_GET)) { 9 long lastModified = getLastModified(req); 10 if (lastModified == -1) { 11 // servlet doesn't support if-modified-since, no reason 12 // to go through further expensive logic 13 doGet(req, resp); 14 } else { 15 long ifModifiedSince = req.getDateHeader(HEADER_IFMODSINCE); 16 if (ifModifiedSince < lastModified) { 17 // If the servlet mod time is later, call doGet() 18 // Round down to the nearest second for a proper compare 19 // A ifModifiedSince of -1 will always be less 20 maybeSetLastModified(resp, lastModified); 21 doGet(req, resp); 22 } else { 23 resp.setStatus(HttpServletResponse.SC_NOT_MODIFIED); 24 } 25 } 26 27 } else if (method.equals(METHOD_HEAD)) { 28 long lastModified = getLastModified(req); 29 maybeSetLastModified(resp, lastModified); 30 doHead(req, resp); 31 32 } else if (method.equals(METHOD_POST)) { 33 doPost(req, resp); 34 35 } else if (method.equals(METHOD_PUT)) { 36 doPut(req, resp); 37 38 } else if (method.equals(METHOD_DELETE)) { 39 doDelete(req, resp); 40 41 } else if (method.equals(METHOD_OPTIONS)) { 42 doOptions(req,resp); 43 44 } else if (method.equals(METHOD_TRACE)) { 45 doTrace(req,resp); 46 47 } else { 48 // 49 // Note that this means NO servlet supports whatever 50 // method was requested, anywhere on this server. 51 // 52 53 /* ... */ 54 } 55}HttpServletBean:没有对
HttpServlet.service()和HttpServlet中do开头的处理请求分发的方法进行重写。FrameworkServlet:重写了
HttpServlet.service(HttpServletRequest, HttpServletResponse)和HttpServlet中do开头的处理请求分发的方法。service(HttpServletRequest, HttpServletResponse):1@Override 2protected void service(HttpServletRequest request, HttpServletResponse response) 3 throws ServletException, IOException { 4 5 HttpMethod httpMethod = HttpMethod.resolve(request.getMethod()); 6 // 请求方式为PATCH或null时 7 if (httpMethod == HttpMethod.PATCH || httpMethod == null) { 8 // 执行请求 9 processRequest(request, response); 10 } 11 else { 12 super.service(request, response); 13 } 14}processRequest():1protected final void processRequest(HttpServletRequest request, HttpServletResponse response) 2 throws ServletException, IOException { 3 4 /* ... */ 5 6 try { 7 // 执行服务 8 doService(request, response); 9 } 10 /* catch ... */ 11 finally { 12 /* ... */ 13 } 14}在
FrameworkServlet中的doGet()、doPost()、doPut()和doDelete()中都是直接调用processRequest()方法:1processRequest(request, response);在
doOptions()和doTrace()中也有对processRequest()方法的调用。doService():交由子类实现。1protected abstract void doService(HttpServletRequest request, HttpServletResponse response) 2 throws Exception;DispatcherServlet:1@Override 2protected void doService(HttpServletRequest request, HttpServletResponse response) throws Exception { 3 logRequest(request); 4 5 // Keep a snapshot of the request attributes in case of an include, 6 // to be able to restore the original attributes after the include. 7 /* ... */ 8 9 // Make framework objects available to handlers and view objects. 10 /* ... */ 11 12 try { 13 // 最终调用doDispatch()来处理 14 doDispatch(request, response); 15 } 16 finally { 17 if (!WebAsyncUtils.getAsyncManager(request).isConcurrentHandlingStarted()) { 18 // Restore the original attribute snapshot, in case of an include. 19 if (attributesSnapshot != null) { 20 restoreAttributesAfterInclude(request, attributesSnapshot); 21 } 22 } 23 } 24}doDispatch():1protected void doDispatch(HttpServletRequest request, HttpServletResponse response) throws Exception { 2 HttpServletRequest processedRequest = request; 3 /* 4 执行链 5 HandlerExecutionChain包含以下三个部分: 6 - handler:与请求所匹配的控制器方法 7 - interceptorList:处理控制器方法的所有拦截器集合,即拦截器链 8 - interceptorIndex:拦截器索引,控制拦截器afterCompletion()的执行 9 */ 10 HandlerExecutionChain mappedHandler = null; 11 boolean multipartRequestParsed = false; 12 13 WebAsyncManager asyncManager = WebAsyncUtils.getAsyncManager(request); 14 15 try { 16 ModelAndView mv = null; 17 Exception dispatchException = null; 18 19 try { 20 processedRequest = checkMultipart(request); 21 multipartRequestParsed = (processedRequest != request); 22 23 // Determine handler for the current request. 24 // 获取当前请求的执行链 25 mappedHandler = getHandler(processedRequest); 26 if (mappedHandler == null) { 27 noHandlerFound(processedRequest, response); 28 return; 29 } 30 31 // Determine handler adapter for the current request. 32 /* 33 获取当前请求的处理器适配器 34 通过控制器方法创建对应的处理器适配器,从而能调用所对应的控制器方法 35 */ 36 HandlerAdapter ha = getHandlerAdapter(mappedHandler.getHandler()); 37 38 // Process last-modified header, if supported by the handler. 39 /* ... */ 40 41 // 执行拦截器链的 preHandle,正序执行 42 if (!mappedHandler.applyPreHandle(processedRequest, response)) { 43 return; 44 } 45 46 // Actually invoke the handler. 47 // 通过HandlerAdapter来调用请求处理,最终获得ModelAndView对象 48 mv = ha.handle(processedRequest, response, mappedHandler.getHandler()); 49 50 if (asyncManager.isConcurrentHandlingStarted()) { 51 return; 52 } 53 54 applyDefaultViewName(processedRequest, mv); 55 // 执行拦截器链的 postHandle,倒序执行 56 mappedHandler.applyPostHandle(processedRequest, response, mv); 57 } 58 /* catch ... */ 59 // 执行完请求的后续处理,如视图渲染、异常处理等等 60 processDispatchResult(processedRequest, response, mappedHandler, mv, dispatchException); 61 } 62 /* catch ... */ 63 /* finally ... */ 64}processDispatchResult():1private void processDispatchResult(HttpServletRequest request, HttpServletResponse response, 2 @Nullable HandlerExecutionChain mappedHandler, @Nullable ModelAndView mv, 3 @Nullable Exception exception) throws Exception { 4 5 boolean errorView = false; 6 7 // 异常处理 8 if (exception != null) { 9 if (exception instanceof ModelAndViewDefiningException) { 10 logger.debug("ModelAndViewDefiningException encountered", exception); 11 // 获取异常页面的视图 12 mv = ((ModelAndViewDefiningException) exception).getModelAndView(); 13 } 14 else { 15 /* ... */ 16 } 17 } 18 19 // Did the handler return a view to render? 20 if (mv != null && !mv.wasCleared()) { 21 // 视图渲染 22 render(mv, request, response); 23 /* ... */ 24 } 25 /* else ... */ 26 27 /* ... */ 28 29 if (mappedHandler != null) { 30 // Exception (if any) is already handled.. 31 // 执行拦截器链的 afterCompletion,倒序执行(此处所有的异常已经被处理完成) 32 mappedHandler.triggerAfterCompletion(request, response, null); 33 } 34}
MVC 执行流程
用户向服务器发送请求,请求被SpringMVC前端控制器
DispatcherServlet捕获。DispatcherServlet对请求URL进行解析,得到请求资源标识符(URI),判断请求URI对应的映射:如果没有对应的映射:
判断是否配置了
mvc:default-servlet-handler(默认处理器)。如果没配置,则控制台报映射查找不到,向客户端展示404错误。
如果有配置,则访问目标资源(一般为静态资源,如JS、CSS、HTML等等)。
如果找不到客户端也会展示404错误。
如果存在对应的映射则接着执行下面的流程。
根据该URI,调用
HandlerMapping获得该Handler配置的所有相关的对象(包括Handler对象以及Handler对象对应的拦截器),最后以HandlerExecutionChain执行链对象的形式返回。DispatcherServlet根据获得的Handler,选择一个合适的HandlerAdapter。如果成功获得
HandlerAdapter,此时将开始执行拦截器的preHandler()方法。根据拦截器链的顺序,正序执行。
提取
Request中的模型数据,填充Handler入参,开始执行Handler(Controller)方法,处理请求。在填充Handler的入参过程中,根据你的配置,Spring将帮你做一些额外的工作:
HttpMessageConveter: 将请求消息(如JSON、XML等数据)转换成一个对象,或将对象转换为指定的响应信息。数据转换:对请求消息进行数据转换。
如
String转换成Integer、Double等。数据格式化:对请求消息进行数据格式化。
如将字符串转换成格式化数字或格式化日期等。
数据验证:验证数据的有效性(长度、格式等),验证结果存储到
BindingResult或Error中。Handler执行完成后,向DispatcherServlet返回一个ModelAndView对象。
如果
Handler被成功执行,则开始执行拦截器的postHandle()方法。根据拦截器链的顺序,倒序执行。
根据返回的
ModelAndView(此时会判断是否存在异常:如果存在异常,则执行HandlerExceptionResolver进行异常处理)选择一个适合的ViewResolver进行视图解析,根据Model和View,来渲染视图。渲染视图完毕执行拦截器的
afterCompletion()方法。根据拦截器链的顺序,倒序执行。
将渲染结果返回给客户端。
评论